SR Wiring into an S13 (DIY Thread)
#1
Slammedxpert
Thread Starter
Join Date: Oct 2007
Location: Virginia Beach
Posts: 6,825
Likes: 0
Received 0 Likes
on
0 Posts


**I'm doing an SR20DET into my S13 and finding a good wiring thread was hard. I came across FRSPORT.COM and I tried to print the page, but it only came up with 3 out of 7 pages because the way it was setup it would cut off. Figured this would help some of you guys so you can print it instead of having to keep looking at the computer constantly.
Doing the wiring for an SR swap can be a daunting task, especially for those who do not want to deal with figuring out which wires to cut & extend. Here at FRSPORT.COM, we will walk you through the wire harness modification so that your engine will start on the first try!
This guide is for swapping an S13 SR motor into an S13 240SX chassis.
Before we begin, please make sure you have the following tools in order to simplify the process:
* A roll of Electrical tape (3M brand works best)
* Wire stripper & cutter
* Soldering iron & solder
* Heat shrink tubing (optional)
* Heatgun / Lighter to shrink the tubing (optional)
Heat shrink tubing and a heatgun is optional, but gives the modifications a professional touch and is less prone to potential future problems.
The first modification required is replacing the SR dash connector with the stock KA dash connector. The SR dash connector (white, as shown in Figure 1) will not mate with the KA dash harness, so it needs to be replaced with the KA dash connector. Cut both the SR & KA dash connectors, and wire the KA one to the SR harness using the table & wiring color guide below.
Figure 1
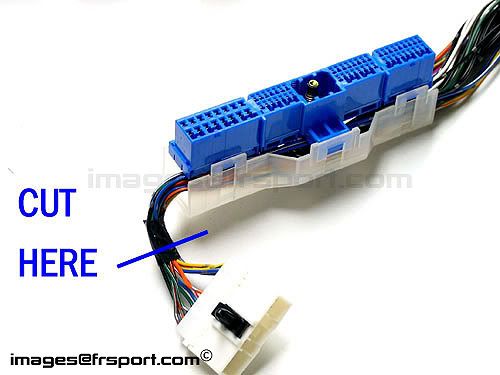
Connect the wires according to the table below:
SR Wire Color KA Wire Color Function
Black (may be more than 1) Black (may be more than 1) Ground
Blue / Green Stripe Blue / Green Stripe AC Signal
Blue / Black Stripe Blue / Black Stripe Water Temperature Signal
Orange Orange Ignition Start
Yellow / Red Stripe Yellow / Red Stripe Tachometer Signal
Yellow / Green Stripe Yellow / Green Stripe Speedometer Signal
The rest of the dash wires are not required, unless you plan to use the consult port. Wrap the unused wires individually in electrical tape or heat shrink tubing to prevent them from shorting out.
The next step is to extend the O2 connector. The connector has three wires:
Brown with yellow stripe, white, and brown, as shown in the image below (Fig. 2 & 3)
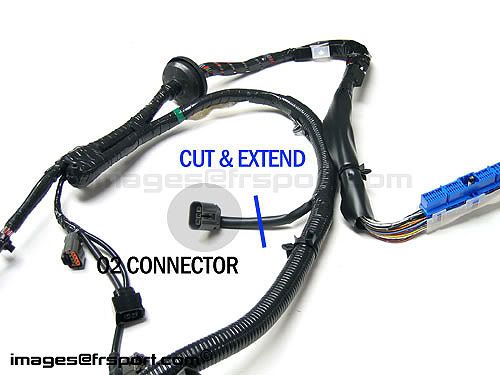
Figure 2
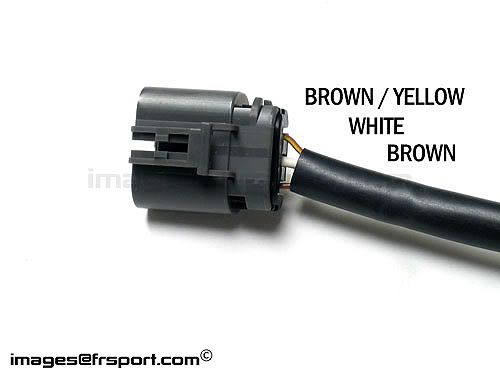
Figure 3
Get 3 pieces of wire about 2 ft. in length and extend the connector, matching the wire colors up. Don't forget to use heat-shrink tubing if you have it. Wrap the newly extended wire in electrical tape.
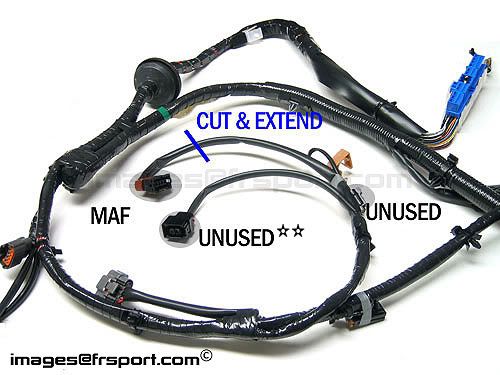
The other wires that needs to be extended are the MAF wires. Locate that plug according to the picture below (Figure 4). The two plugs next to the MAF plug are unused and not needed to get your SR running.
Figure 4
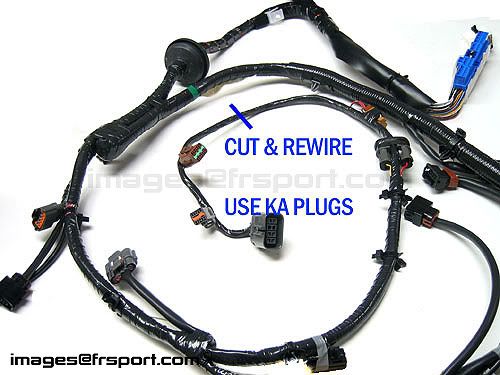
**One of our customer was gracious enough to let us know that this plug is the power steering switch. If wired up to the power steering switch, it will enable the ECU to bump up the idle slightly at full lock. This plug is optional and is not required to get your car running.
These MAF wires need to extend across the engine bay to the driver side fender. Extend them as long as they need to be.
FOR SOHC MAF USERS, THE PINOUT IS AS FOLLOWS:
SOHC MAF PIN SR WIRE COLOR FUNCTION
A Black / White +12V (Power)
B Black MAF Ground
C White MAF Signal
FOR Z32 MAF USERS, THE PINOUT IS:
(ECU retune is required)
Z32 MAF PIN SR WIRE COLOR FUNCTION
A - Not connected
B White MAF signal
C Black MAF Ground
D - Ground (connect to C)
E Black / White +12V Ignition
F - Not Connected
The last step is to cut the end of the harness with the three plugs and mate it to the chassis, as shown in Figure 5. The plugs have different pinouts, so you will either need to use the plugs on the KA harness, or wire them up directly if you don't have the KA harness. Only two of those plugs are used, while the third is unrequired.
Figure 5a
The wire colors match up according to the following table:
SR Wire Color KA Wire Color Function
Black / Pink stripe Black / Pink stripe Fuel pump relay
Green / Orange stripe Green / Orange stripe Transmission neutral switch
Red / Black stripe Red / Black stripe ECU relay
Green / Yellow stripe Green / Yellow stripe* AC relay
Black / White stripe Black / White stripe ECU power
Blue / Green stripe Blue / Green stripe AC relay
Black / Yellow stripe Black / Yellow stripe Idle air control solenoid power
Brown Any +12V Switched** O2 sensor power
Red Red ECU backup power
Black / Red
Blue / Red Black / Red stripe Main ignition power
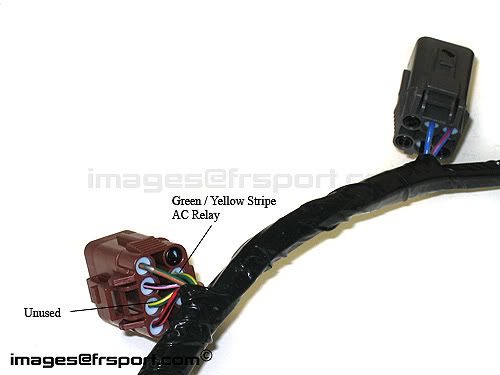
*Update 11-19-06: It seems like there are some confusion regarding the Green/Yellow stripe wire. On the S13 chassis side, there is only 1 Green/Yellow wire while on the SR harness there are two. The Green/Yellow wire is for AC relay while the other on the SR harness is unused and can be taped off. If you do not plan to use AC, you do not need to worry about these wires. For those who would like to wire up the AC system, see picture below for correct wire to connect.
**Update 11-19-06: The O2 sensor power can be connected to any +12V switched source. This wire can be connected to the black / red stripe (Main ignition power) or any other wire that provides +12V when the key is in the "ON" position. Connecting the sensor power wire to main ignition power means there will be many wires connected in the same location with a lot of current. I would recommend soldering these wires together and heat-shrinking them.
Fig. 5b
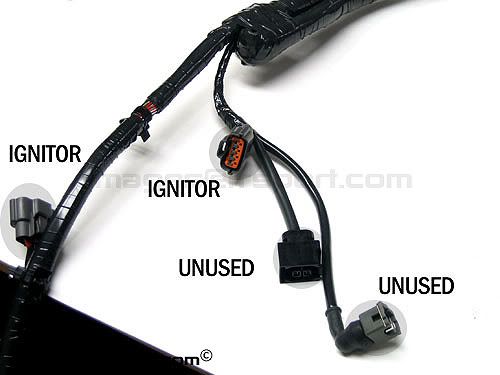
Finally, the two plugs by the ignitor connectors are also unused and can be tucked away or wrapped in electrical tape.
Figure 6
If done correctly, your engine will start when cranked! Good luck!
Doing the wiring for an SR swap can be a daunting task, especially for those who do not want to deal with figuring out which wires to cut & extend. Here at FRSPORT.COM, we will walk you through the wire harness modification so that your engine will start on the first try!
This guide is for swapping an S13 SR motor into an S13 240SX chassis.
Before we begin, please make sure you have the following tools in order to simplify the process:
* A roll of Electrical tape (3M brand works best)
* Wire stripper & cutter
* Soldering iron & solder
* Heat shrink tubing (optional)
* Heatgun / Lighter to shrink the tubing (optional)
Heat shrink tubing and a heatgun is optional, but gives the modifications a professional touch and is less prone to potential future problems.
The first modification required is replacing the SR dash connector with the stock KA dash connector. The SR dash connector (white, as shown in Figure 1) will not mate with the KA dash harness, so it needs to be replaced with the KA dash connector. Cut both the SR & KA dash connectors, and wire the KA one to the SR harness using the table & wiring color guide below.
Figure 1

Connect the wires according to the table below:
SR Wire Color KA Wire Color Function
Black (may be more than 1) Black (may be more than 1) Ground
Blue / Green Stripe Blue / Green Stripe AC Signal
Blue / Black Stripe Blue / Black Stripe Water Temperature Signal
Orange Orange Ignition Start
Yellow / Red Stripe Yellow / Red Stripe Tachometer Signal
Yellow / Green Stripe Yellow / Green Stripe Speedometer Signal
The rest of the dash wires are not required, unless you plan to use the consult port. Wrap the unused wires individually in electrical tape or heat shrink tubing to prevent them from shorting out.
The next step is to extend the O2 connector. The connector has three wires:
Brown with yellow stripe, white, and brown, as shown in the image below (Fig. 2 & 3)

Figure 2

Figure 3

Get 3 pieces of wire about 2 ft. in length and extend the connector, matching the wire colors up. Don't forget to use heat-shrink tubing if you have it. Wrap the newly extended wire in electrical tape.
The other wires that needs to be extended are the MAF wires. Locate that plug according to the picture below (Figure 4). The two plugs next to the MAF plug are unused and not needed to get your SR running.
Figure 4

**One of our customer was gracious enough to let us know that this plug is the power steering switch. If wired up to the power steering switch, it will enable the ECU to bump up the idle slightly at full lock. This plug is optional and is not required to get your car running.
These MAF wires need to extend across the engine bay to the driver side fender. Extend them as long as they need to be.
FOR SOHC MAF USERS, THE PINOUT IS AS FOLLOWS:
SOHC MAF PIN SR WIRE COLOR FUNCTION
A Black / White +12V (Power)
B Black MAF Ground
C White MAF Signal
FOR Z32 MAF USERS, THE PINOUT IS:
(ECU retune is required)
Z32 MAF PIN SR WIRE COLOR FUNCTION
A - Not connected
B White MAF signal
C Black MAF Ground
D - Ground (connect to C)
E Black / White +12V Ignition
F - Not Connected
The last step is to cut the end of the harness with the three plugs and mate it to the chassis, as shown in Figure 5. The plugs have different pinouts, so you will either need to use the plugs on the KA harness, or wire them up directly if you don't have the KA harness. Only two of those plugs are used, while the third is unrequired.
Figure 5a
The wire colors match up according to the following table:
SR Wire Color KA Wire Color Function
Black / Pink stripe Black / Pink stripe Fuel pump relay
Green / Orange stripe Green / Orange stripe Transmission neutral switch
Red / Black stripe Red / Black stripe ECU relay
Green / Yellow stripe Green / Yellow stripe* AC relay
Black / White stripe Black / White stripe ECU power
Blue / Green stripe Blue / Green stripe AC relay
Black / Yellow stripe Black / Yellow stripe Idle air control solenoid power
Brown Any +12V Switched** O2 sensor power
Red Red ECU backup power
Black / Red
Blue / Red Black / Red stripe Main ignition power

*Update 11-19-06: It seems like there are some confusion regarding the Green/Yellow stripe wire. On the S13 chassis side, there is only 1 Green/Yellow wire while on the SR harness there are two. The Green/Yellow wire is for AC relay while the other on the SR harness is unused and can be taped off. If you do not plan to use AC, you do not need to worry about these wires. For those who would like to wire up the AC system, see picture below for correct wire to connect.
**Update 11-19-06: The O2 sensor power can be connected to any +12V switched source. This wire can be connected to the black / red stripe (Main ignition power) or any other wire that provides +12V when the key is in the "ON" position. Connecting the sensor power wire to main ignition power means there will be many wires connected in the same location with a lot of current. I would recommend soldering these wires together and heat-shrinking them.
Fig. 5b

Finally, the two plugs by the ignitor connectors are also unused and can be tucked away or wrapped in electrical tape.
Figure 6
If done correctly, your engine will start when cranked! Good luck!
#2
FACK YER ESS PEE OHH
Join Date: Aug 2007
Location: VAGINA BEACHH
Posts: 7,144
Likes: 0
Received 0 Likes
on
0 Posts


Yup
And I'm now reminded why I don't do wiring...Spelled out or not, I still feel fucking retarded
Thanks Mike.
lolol
And I'm now reminded why I don't do wiring...Spelled out or not, I still feel fucking retarded
Thanks Mike.
lolol
#3
Slammedxpert
Thread Starter
Join Date: Oct 2007
Location: Virginia Beach
Posts: 6,825
Likes: 0
Received 0 Likes
on
0 Posts


Welcome. hahah.
It's actually very simple. I would have had it running today, yet I wanted to start the chassis harness tuck instead. It will be running and drive able this weekend. Now if only the PBM intercooler would come in. haha.
It's actually very simple. I would have had it running today, yet I wanted to start the chassis harness tuck instead. It will be running and drive able this weekend. Now if only the PBM intercooler would come in. haha.
#4
i have used this diy, some wires that goes on the chassis are a little different (maybe because of KA sohc-to-SR)
for example i had two red wires comming from the 240sx chassis into one to the SR harness
all in all, this DIY write up works, the car started right up the first try.
for example i had two red wires comming from the 240sx chassis into one to the SR harness
all in all, this DIY write up works, the car started right up the first try.
#5
FACK YER ESS PEE OHH
Join Date: Aug 2007
Location: VAGINA BEACHH
Posts: 7,144
Likes: 0
Received 0 Likes
on
0 Posts


Did you order the same setup that Geoff has?
Yeah, There's a few small Wiring Diffences when it comes to the sohc KA and the dohc KA
#7
Slammedxpert
Thread Starter
Join Date: Oct 2007
Location: Virginia Beach
Posts: 6,825
Likes: 0
Received 0 Likes
on
0 Posts


Yeap, I sure did!
#9
Slammedxpert
Thread Starter
Join Date: Oct 2007
Location: Virginia Beach
Posts: 6,825
Likes: 0
Received 0 Likes
on
0 Posts


#10
FACK YER ESS PEE OHH
Join Date: Aug 2007
Location: VAGINA BEACHH
Posts: 7,144
Likes: 0
Received 0 Likes
on
0 Posts


